9/29/13

REVIEW : Innisfree's Mineral Water Foundation


I can't believe I haven't made any review for this foundation before. It's Innisfree Mineral Water Foundation and mine is #23- True Beige. They have 3 shades available. #23 is the darkest shade that they have. I was thorn between 2 shades 23 and 21 - but I picked 23 anyway because I also go for the darkest shade too for the fitting foundation.


This foundation retails for KRW 15.000 and it contain 35ml of product. I've had this product for a long time that the packaging is actually very very dirty - I washed it with my face cleanser to make it look presentable lol. Anyway, it has SPF 15 PA+ and it contain Jeju natural mineral and green tea, which both are Innisfree's products main ingredient I suppose?

The point of this foundation is you have to shake it first before every usage. It has this little metal ball inside - i think - and it mixes the product inside as you shake it.


It doesn't have a pump, but having a smaller opening really makes it easier to control how much product coming out of the bottle. The foundation itself is really watery - in the same time it's still creamy though. You don't have to press the crap out of the bottle to get the product out, it's watery enough to get press out without much effort!


So again, the foundation is watery, it has a light to medium coverage and it blends nice with the skin. It has this typical 'innisfree' scents - like a very nature-y scents that I can't pick up.

I have 3 ways to apply this foundation - Sponge, brush, and my finger. In which the first is my favorite and the last to be my least favorite. Anyway this foundation sets really fast, I have to do my foundation area per area and blend it before I could move to another area. That's not a problem though, atleast for me.

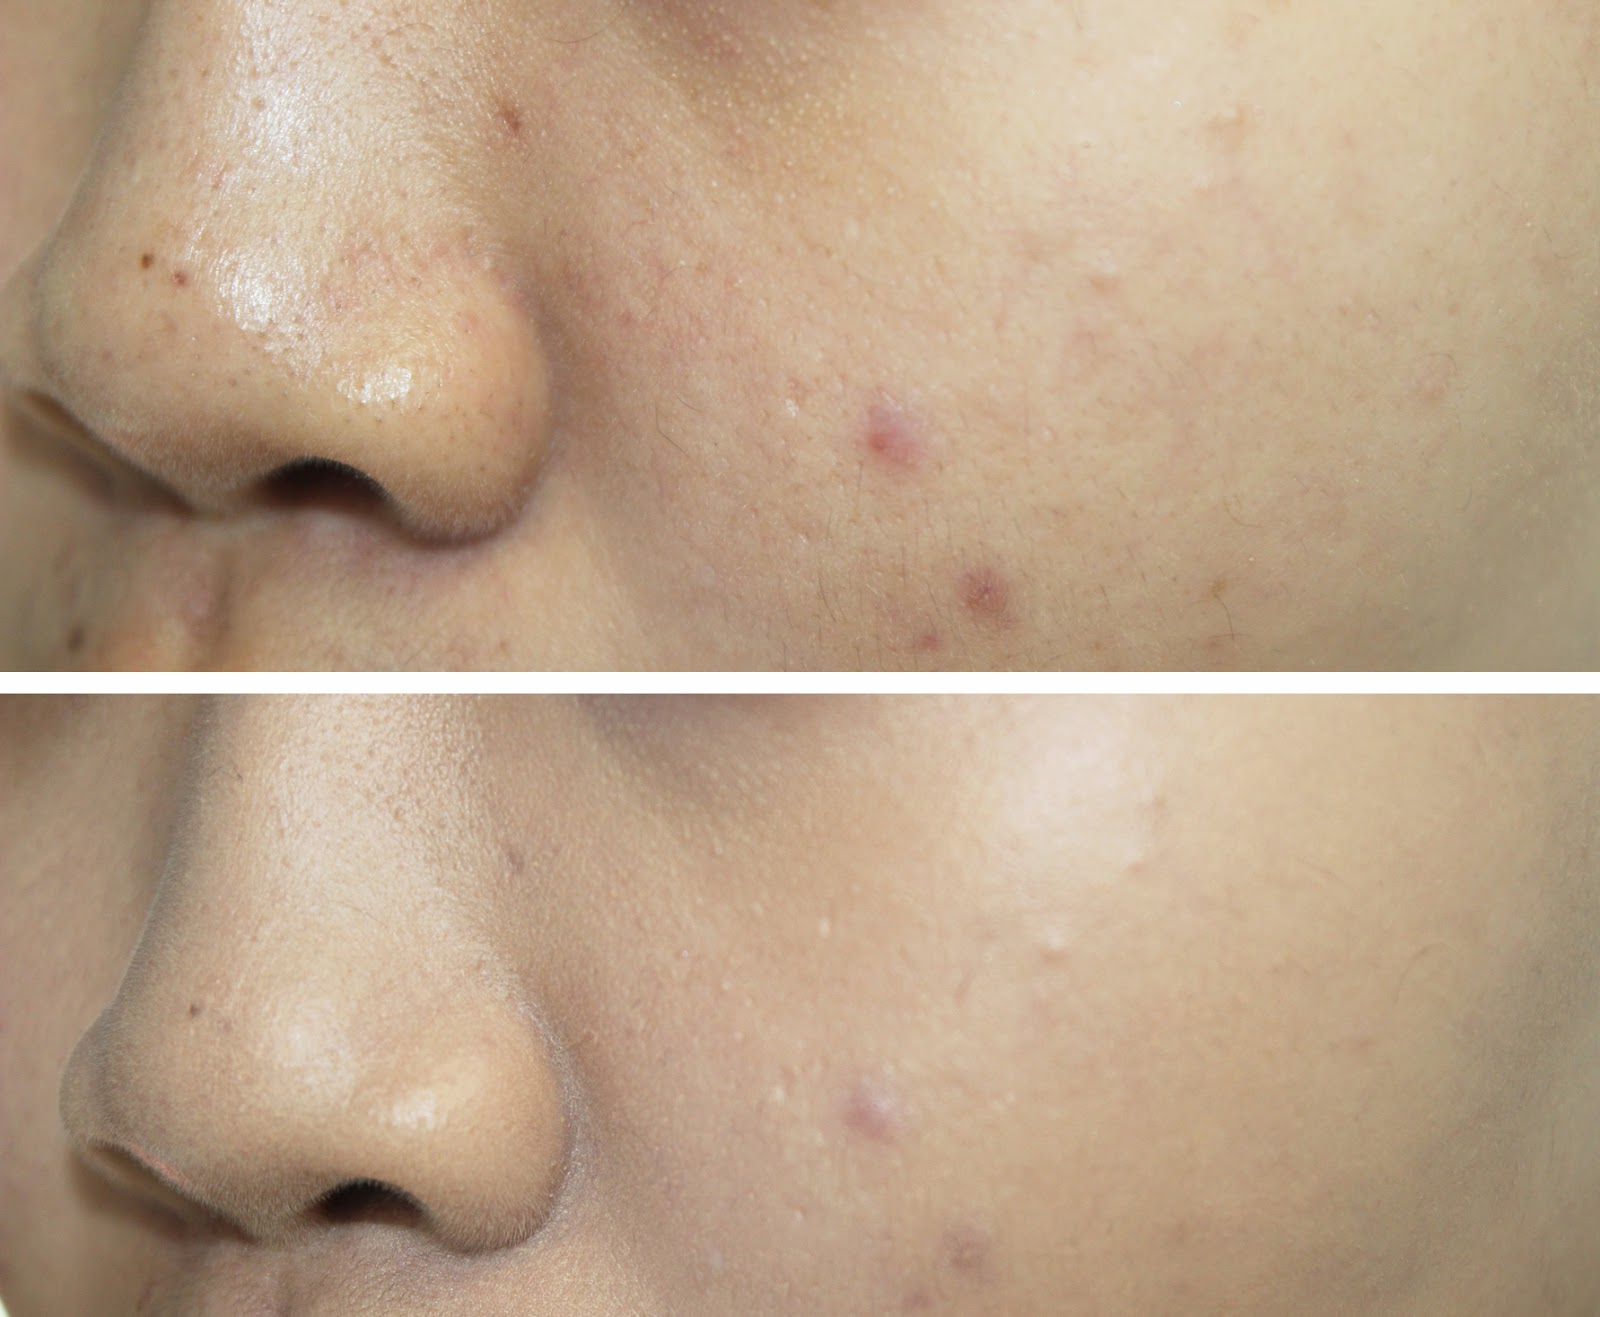
In the swatch below, I've put 2 layers where I have my blemishes. Even with 2 layers the coverage is still medium. That's enough for my daily look, but with my skin condition now I still need concealer. Nevertheless the product could cover the redness and some even out my skin tone. The foundation is relatively light weight and it does stated that it'll feel just like your bare skin. Well, it does give a lighter feeling - even comparing to some of BB creams that I own.


I must say that this foundation is long lasting - more if you do apply some good primer before. The finish of this foundation is more to a matte, not super matte, it still has some glow but totally closer to a matte finish. I do set the foundation with some setting powder still.

Overall, I super love this foundation, there were time when I only wear this foundation for 2++ months straight. I switched to other foundation just because my skin is in a bad state right now. But once my face cleared up, I know I'm gonna get a lot of uses out of this foundation. I've featured this foundation for my summer foundation routine post, read HERE to see how I apply it! :)

Another thing is I tend to use a lot of this product, comparing to other foundation to get even application on my whole face. The reason is might be because the product sets kinda fast - so it is kinda hard to drag the product across your face. I usually uses 1cm diameter of product, applied twice and a half. Layering the product wouldn't give you that heavy feeling.

Only with foundation - nothing else. No concealer, no setting powder, nothing.

Comparing to how much product I used each time I did my face - and the fact that there's the time I reach this for every day, I still have more than half product inside. So I could say that this could last you for some time (What foundation wouldn't anyway?)

ANW thankyou for reading! Have a question? Comment down below I'll get to you ASAP! :)


Where to find me :
tumblr // youtube // instagram // twitter // deviantart
xx

9/28/13

REVIEW : Nature Republic's Provence Ultra Longlash & Curling Mascara


Today's review will be Nature Republic's Provence Ultra Longlash & Curling Mascara. This product is the other product other than my NP's cushion that I purchased solely for an EXO poster. I've talked about that in the other post, click here to read!

Anyway, I did purchase this on impulse but I've actually tried my friend's first and I liked them! Much much much better than my current mascara, Etude House's that is not satisfying. Then come the chance and I picked them up. Honestly I kept them for a while because I want to finish my Etude House's first, but eventually I gave up and used them. Just then.......I realized I picked the wrong type!!!

I wanted the volume one :( Instead I got the curling one.... I felt so stupid.


Nevertheless, I definitely still like the formulation. I've bought this mascara for a while now, and i forgot the price - I looked online into NP's online store but strangely this mascara is not available there! The closest that I got is a set price (mascara + eye remover) which is KRW 12.900. I estimated the mascara only would be around KRW 8.000 (+discount, NP is always on sale).

On the packaging it stated

"This mascara contains gold powder and makes your eyelashes look refined and full. Its "long&balloon" system makes your lashes look longer and fuller, while its white gold liquid and Calendula officinalis flower extract make your eyelashes look healthy.

GOLD POWDER? Ok I'm confused.
Anyway Calendula officinalis is 'Pot Marigold' flower and often used in cosmetic. I can't figure out about the gold powder tho.


In my opinion the packaging is so-so, but it doesn't look cheap either. After a few lookout, the flower shape on the cap looks pretty cute too. The size is quite slim too for a mascara - I like it!

Let's talk about the applicator, shall we? I pretty much like the shape of the wand because the curve actually made it easier to apply mascara on my inner lashes. I don't like the idea of flicking my mascara wand vertically to reach the inner corner because it tends to clump and disturbing my vision. With this wand, it is less clumpy - considering you scraped the excess in the bottle first.

LEFT two layers of mascara RIGHT nothing

In the conclusion, the mascara is actually pretty good! Even though I was quite shocked when I know I purchased the wrong one, turned out I like this one too! The mascara is actually thick enough with 1 layer - as a fan of spidery lashes I just can't stop at 1 layer! The most important thing is that this mascara didn't smudge on me. And it hold my curls quite well too! 

The most surprising thing is  : it didn't smudge - but it's also easy to remove. Well it means that this isn't as water proof but for daily look I don't want to burden my eyes with waterproof mascara. This product could be easily removed with warm water, just slightly pinch your lashes and drag the product away and it will effortlessly removed! 

I noticed that sometimes Nature Republic is overlooked and I know is quite harder to get comparing to other brands that have similar price range like Etude House, Faceshop, Holika Holika etc. But I personally thinks that the 'hit' chances in Nature Republic's products are much higher than other brands I stated above. But #imjustsaying. For similar price range, I think it would be great to try out and venture other Korean brand products once in a while! :)

Have a great day! x


Where to find me :
tumblr // youtube // instagram // twitter // deviantart
xx

9/25/13

OOTD : Haeundae Photoshoot

Last week on the Chuseok holiday I went to Haeundae Beach (which is in Busan, fyi) and I helped played around while my senior took some pictures for her portfolio. I did basically nothing but I had nothing else better - so I took some OOTD picture there (also my friend's, with their photoshoot costume!)

We had a blast and also looked by thousands of people that apparently spending their Chuseok holiday in Haeundae. I spotted a lot of foreigner - a lot of Indonesian too. Suddenly Haeundae felt like Ancol Beach all over.

So here's the pictures :


CROP TOP h&m | HIGH WAISTED WASHED OUT SHORT gmarket
CARDIGAN gmarket | NECKLACE muhaspace
BAG stylenanda | MUSTARD SANDALS unbranded bought in korea
SUNNIES stylenanda


And here's my friend's!


And here's the behind the scene video I made from the photoshoot and to see the results, I have uploaded them on my Portfolio Pages


And to finish this post off : My #fotd


Here's the pic of my all-time-fav starbuck's beverage that beats Vanilla Latte : DOLCE LATTE<3


thankyou for reading!xx


Where to find me :
tumblr // youtube // instagram // twitter // deviantart
xx

How-to : Simple Eyes + Dark Red Lips!

"Bye summer, it's Autumn Again.."

Anyway hows your week everyone!? Mine is hectic because....... I got sunk in Chuseok holiday now I'm left with all these works that I supposed to do on Chuseok. Damn procrastination! (Damn you Korea for your fast internet!)

So, I've been taking these pictures of my eyes for a tutorial, but I realized that the coloration turned out really weird because I have to use flash for all the pictures! I've tried to fix them in photoshop and this is the best I could make! (I really considered to not uploading these really...)


This look is inspired by Get it Beauty SELF by BEG Gain for Espoir. The look is very simple but alluring, of course it is real easy to re-do! I did not use the exact product and I even make it the way I prefer them to be. In the video tutorial, her lips is more to rosy pink - I changed that into dark vampy red, but of course you can go with rosy pink, nudes, red, or whatever you prefer because the eyes is really simple!


I've already applied my VDL's Perfection Wear Foundation, 3CE's Full Cover Concealer and Innisfree No-Sebum Powder and also did my eyebrows. So here's the step by step! (All eyeshadows are from The Balm's Nude Tude Palette - I only use two colors and you can use whatever you have!)

                               1                               


First I applied 'Snooby' from the Nude Tude Palette and it's a sparkly gold color all over my lid. Just make sure you apply the color on the lid only, don't go over the crease line. 

                               2                               


Next, not like I usually do this, but I'm doing my eyeliner first. I use an eyeliner pencil because I'm going to smudge them later. Instead of making a cat eye, I don't flick the end but making them follow the natural line of my eyes. Draw the line about 0.5cm - 1 cm longer than your natural line to give and illusion of bigger eye. 

And you want the end to be pointy, so make sure your eyeliner is sharp.


                               3                               


Then, I'm taking a matte deep burgundy-brown color "Sexy" from the Nude Tude Palette with a pencil brush or a smaller size shadow brush, I'm just applying the color right above the eyeliner I just applied. Don't drag the color over your crease! 


                               4                               


After that, I take a fluffy brush and blend the harsh line with the same color as the lid color I applied before. If you want the look to be smokier than this, the take a brown color and sweep that over to deepen the look. 


                               5                               


This step is completely optional, but I'm taking the 'Sexy' again and using an angled brush to elongate the 'wing'. If you're satisfied with the length just skin this step! 


                               6                               


Again, to deepen the look I'm taking the eyeliner from before and line my waterline. After that taking a smaller brush dipped into 'Sexy', I'm also smudging the lower lash line.


                               7                               


Last step! Mascara! Apply your favorite volumizing mascara on both lower and upper lashes!
I'm using Nature Republic's Provence Mascara


                               lips                               


For the lips, I first covered my lips with a concealer and then applied the vampy red lipstick only in the center and blend them together! I personally don't prefer gradation lips look - but to recreated the look I did this gradation lips! 

And I'm sure a lot of you prefer gradation lips too (?)


The lipstick I'm using is Nature Republic's Petit Cherry Rouge in H11 Real Black Rose

And I'm finished! :D


The funny thing is, as I look back through the pictures I realized the color didn't really showed up when I opened my eyes! lol. But that's Korean makeup style for ya! And I do think it's much more alluring if I posed with my eyes closed :p

The look is simple, easy, and I only used 2 eyeshadows! You can re-create this look with any dark colored shadow that you want! I just think burgundy is perfect for Autumn, that's all! :D 

Oh yeah! Almost forgot, for the blush I'm using 3CE Blusher in #Gold Beige 

What do you think? :) 
Have a great autumn ahead!


Where to find me :
tumblr // youtube // instagram // twitter // deviantart
xx

9/23/13

REVIEW : Innisfree Color Glow Lipstick & Glossy Lip Lacquer


Today I'm going to review two products at once! Both Innisfree - Innisfree Color Glow Lipstick in #6 Maple Burgundy Pink (Retail for KRW 12.000) and Innisfree Glossy Lip Lacquer also in #6 Maple Burgundy Pink (Retail for KRW 8.000)

Both of the product produce a burgundy pink color, hence the name - and the color on the tube and the tube swatch is definitely darker than the actual color. Also I don't know why in the pictures that I took they look so red! 


In the packaging they said moisture shine, melting texture, rich color, camelia oil, and 3-free-system. Comes in 10 color selections and this is the color that SNSD Yoona's wear on the advertisement. It's Innisfree Autumn 2013 collection so the color selections are so 'autumn'ish if that makes sense.


This lipstick color payoff is a-ma-zing. Comparing on how creamy it is the pigmentation is awesome!

The lipstick is so moisturizing, i don't actually need lip balm before using it. You know how sometimes using a vivid colored lipstick could accentuate your lip's line, it's not happening with this one. As much as I love moisturizing lip colors,

I hate it when they're so creamy the stick melt down / break apart - just like what happened to my NYX round lipstick(s). But again, it's not happening with this one because the metal part actually keep the product together and it won't break apart I guarantee you!


For the finish, it's very glossy. However it's not sticky in your lips! I know glossy lip product tend to lasts shorter than matte lipstick, but this one stays quite long! It was a shocker because I definitely though that the color would faded off after I ate my meal, but it clearly still there. Well, you do need to reapply some more but it's not as bad as I would think tho.


The lipgloss of course has a less vivid color - very suitable for those who want to try bright colored lips, toned down version. But it is still vivid, you can toned them down by applying a nude lipstick first and the lip gloss on top of it. The lipgloss has a glossier finish and shorter life span - i meant it doesn't last as long as the lipstick. The product is not sticky at all and that's I really appreciate!

The reason why I bought the gloss is because when applied together - the color become a little darker and I like the look (I swatched them on the store!). You can see in the swatch below that both of them have great pigmentations, in the lips the gloss has that sheerness to it.

I specifically like the lip gloss' applicator, because it's a tad bit wider and shorter than regular applicator, it just make applying gloss much easier!

LEFT lip gloss RIGHT lipstick 

Both of the product don't have any significant scent / taste which I know it's preferable to some people. But one thing about the lipstick - I do love the size better than the Creamy Tint one, but the matte coating make the product gets dirty so fast! The lip gloss is much better because 70% of it was glass - obviously. But the lipstick is a mess! As long as you keep them in somewhere clean I don't think it's a big problem, though I like to toss my lipstick into my purse and it turns grayish in a day!


Overall, I totally love both of the these product - though if I have to choose one to repurchase, I'll choose the lipstick over the gloss! Not only I like the packaging, but the formulation is so great! The gloss was amazing but I've over my obsession over glosses and totally into lipsticks - so I'll go with the lipstick.


I can see a lot of people are interested in this product even before the actual launch, just because the 'Creamy Tint' was a big hit. I personally prefer this one over the Creamy Tint - not only for the formulation but also the color selection that are much darker and warmer. I really hope that Innisfree would actually expand the collection, just like what they did to the 'Creamy Tint'! 

I could see myself purchasing the nude one next month on Innisfree's Membership Day Sale lol


Where to find me :
tumblr // youtube // instagram // twitter // deviantart
xx


Theme created by Sweet Lemon Grey